
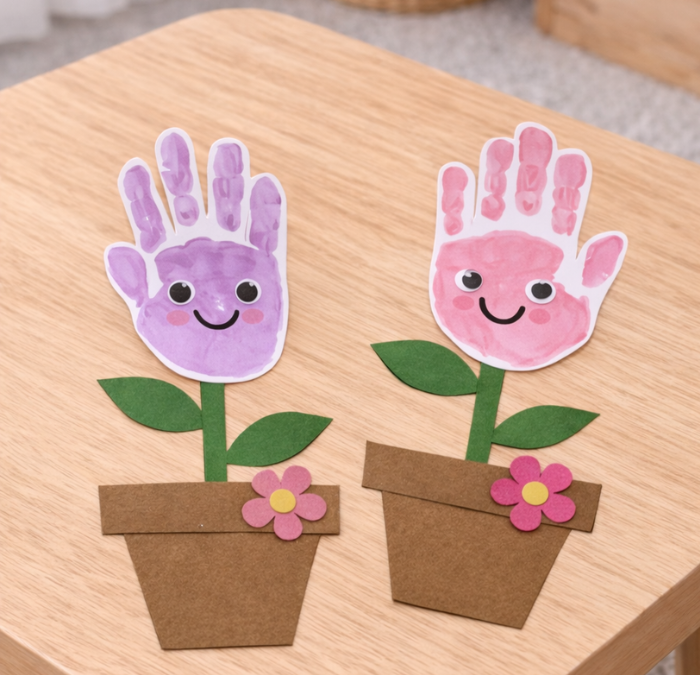
This spring handprint flower craft is one of the easiest and most beautiful spring crafts for kids you will find. It is a perfect toddler activity, a wonderful preschool craft, and a go-to spring art project for kids of all ages. All you need is washable paint, construction paper, and a little creativity. The result is a stunning spring flower craft that doubles as keepsake artwork parents will treasure for years.
Handprint crafts for kids are always a hit because they are quick, mess-friendly, and capture a moment in time. This spring handprint art project is perfect for March, April, and May, making it ideal for spring break activities, classroom art projects, Easter crafts for kids, Mother’s Day gifts, and end-of-year preschool keepsakes.
Why Kids and Parents Love This Spring Craft
There is a reason handprint flower crafts consistently rank among the most popular spring crafts for toddlers and preschoolers. They are:
- Simple enough for one-year-olds, two-year-olds, and three-year-olds with a little help
- Perfect for fine motor skill development and sensory play with paint
- A meaningful keepsake craft that captures your child’s tiny hands
- Easy to adapt as a Mother’s Day craft, Easter activity, or spring classroom project
- Budget-friendly using basic supplies from the dollar store or items you already have at home
Supplies You Need for This Spring Handprint Flower Craft
This easy spring craft for kids uses basic art supplies. Here is everything you will need:
For the Handprint Flowers
- Washable kids paint in spring colors (pink, yellow, lavender, coral, orange, light blue) Washable Paint for Kids
- White cardstock or thick white paper White Cardstock
- A foam brush or sponge brush for applying paint to little hands Foam Paint Brushes
- Wet wipes or a damp cloth for quick cleanup between colors Kids Face and Hand Wipes
- Googly eyes (optional but highly recommended for the cutest results) Googly Eyes
- A black marker or paint pen for drawing a smile and rosy cheeks on each flower face Black Sharpie
- Pink paint or a pink marker for adding blush cheeks to the handprint flower Washable Paint for Kids
For the Flower Pot Assembly
- Green construction paper for stems and leaves Construction Paper
- Brown construction paper for the flower pot
- Child-safe scissors Training Scissors for Kids
- Glue stick or white school glue Glue Set
- A piece of blue or white cardstock or construction paper as the background
- Small foam flower stickers or die-cut flower shapes to decorate the pot (optional but adorable) Foam Flowers
Budget tip: You can find washable paint, construction paper packs, and foam brushes at the dollar store, Target dollar section, or Amazon.
How to Make a Spring Handprint Flower: Step by Step Instructions
Follow these easy steps to create your spring handprint flower art project. This activity works great as a guided toddler craft, a preschool spring art project, or a fun afternoon activity for kids at home.
Step 1: Set Up Your Paint Station
Lay down a plastic tablecloth or newspaper to protect your surface. Pour your spring-colored washable paints into shallow dishes or onto a paper plate. Choose two or three spring colors per flower for a beautiful, vibrant look. Great color combinations include pink and yellow, lavender and white, or orange and coral.
Step 2: Paint Your Child’s Hand
Using a foam brush, apply washable paint evenly across your child’s entire hand including the fingers and palm. You can use one solid color or blend two spring colors together for a gorgeous watercolor flower effect. Make sure the whole hand is covered for a clean, full handprint.
Step 3: Press and Print
Press your child’s painted hand firmly onto white cardstock. Hold for a few seconds and press down gently on each finger to make sure every part prints clearly. Lift straight up to reveal the handprint flower shape. The fingers become the flower petals and the palm becomes the flower center. Repeat with different spring colors to make a bouquet of handprint flowers.
Step 4: Let It Dry Completely
Set the handprint pages aside and allow the paint to dry completely. This usually takes 20 to 30 minutes depending on how thickly the paint was applied. While you wait, this is a great time to cut out the flower pot and stems.
Step 5: Cut Out the Handprint Flowers
Once the paint is fully dry, carefully cut around the outline of each handprint. Older kids can do this step themselves as a scissor skills practice activity. For toddlers and
younger preschoolers, a parent or caregiver can do the cutting. Cut as close to the handprint edges as possible for a clean flower shape.
Step 6: Add a Cute Smiley Face
This is the step that takes your handprint flowers from pretty to absolutely adorable. Once the handprints are cut out, glue two googly eyes onto the palm of each handprint flower. Use a black marker or paint pen to draw a simple curved smile underneath the eyes. Add two small pink circles or dabs of pink paint on either side of the smile for rosy cheeks. The result is a smiling flower character that kids absolutely love and that makes for the most irresistible photos. This simple addition turns a classic spring handprint craft into a show-stopping piece of kids wall art.
Step 7: Create the Stems, Leaves, and Pot
From green construction paper, cut long thin strips for the flower stems and simple leaf shapes. From brown construction paper, cut a classic flower pot shape. A simple trapezoid works perfectly as a pot shape and is easy even for beginners to cut freehand. You can also print a free flower pot template online and trace it if you prefer.
Step 8: Assemble Your Spring Handprint Flower Craft
On your background paper, glue the brown pot at the bottom center. Glue the green stems coming up out of the pot. Add the leaf cutouts along the sides of the stems. Finally, glue each smiling handprint flower at the top of a stem with the fingers pointing upward like flower petals. For extra charm, press a few small foam flower stickers or die-cut flower shapes onto the front of the pot for decoration. Press everything down firmly and let the glue dry. Your beautiful spring handprint flower bouquet is complete.
Tips for the Best Spring Handprint Craft Results
- Use washable paint so cleanup is easy, especially for toddler crafts and baby handprint activities
- Work quickly after painting the hand so the paint does not dry before you press
- Make multiple handprints in different colors to create a full spring flower bouquet
- Add a child’s name and the date to the back for a meaningful keepsake
- Frame the finished piece for a one-of-a-kind piece of spring wall art for kids rooms
- Make one every spring to track how your child’s hands grow year over year
Fun Variations on the Spring Handprint Flower Craft
Once you master the basic spring handprint flower, try these creative variations to keep the fun going all spring long:
- Footprint flowers: Use a foot instead of a hand for a sunflower or tulip effect
- Rainbow spring bouquet: Use a different color for each flower for a rainbow handprint craft
- Spring card craft: Fold cardstock in half and create a handprint flower card for Mother’s Day or Easter
- Tissue paper pot: Decorate the brown construction paper pot with crinkled tissue paper for added texture
- Finger dot center: Dip a finger in yellow or orange paint and add dots to the palm center of the flower for realistic detail
- Glitter spring flowers: Sprinkle biodegradable glitter over the wet paint for a sparkly spring art project
Ways to Use Your Spring Handprint Flower Art
This spring kids craft is incredibly versatile. Here are some of the most popular ways families and teachers use finished spring handprint flower projects:
- Frame it as spring nursery decor or kids bedroom wall art
- Give it as a homemade Mother’s Day gift from toddler or preschooler
- Use it as a handmade Easter card or spring greeting card
- Display it on the classroom or homeschool bulletin board as spring seasonal art
- Add it to a spring memory book or scrapbook alongside a photo of your child
- Laminate it for a durable spring placemat kids will love
What Age Is This Spring Handprint Craft For?
This spring handprint flower craft is suitable for a wide age range. Baby handprint flower crafts can be done with infants as young as 6 months with full adult assistance. Toddler handprint crafts for ages 1, 2, and 3 work well with a parent guiding the pressing step. Preschool spring crafts for 3 and 4 year olds allow kids to participate in most of the steps including painting their own hand and assembling the flower. Kindergarten spring art projects and elementary spring crafts give older kids ages 5 and up the independence to complete the full project on their own. This is truly an all-ages spring painting activity for kids.
Frequently Asked Questions
What kind of paint is best for handprint crafts?
Washable tempera paint is the best choice for kids handprint crafts. It goes on smoothly, gives a vivid color payoff, and washes off skin and most surfaces with soap and water. Avoid acrylic paint for young children as it is harder to remove from skin and clothing.
Can I do this craft with a baby?
Yes, baby handprint flower crafts are some of the most cherished keepsakes. Always use non-toxic washable paint and have everything set up before you paint the baby’s hand so you can press and wipe quickly. Many parents do baby handprint crafts starting around 3 to 6 months old.
How do I preserve a handprint craft?
To preserve a handprint art project long term, consider framing it under UV-protective glass or laminating it. You can also scan or photograph the finished piece to create digital copies. Adding the date and age on the back helps you remember exactly when it was made.