
Spring is hands down the best time of year to craft with toddlers and preschoolers. Everything outside is waking up, your child is noticing butterflies and bees and flowers for the first time this season, and there is a natural energy and curiosity that makes sitting down to make something together feel exciting rather than like something you are forcing into the day.
Paper plates are one of those supplies that are always in the back of the pantry, and it turns out they are one of the most versatile craft materials you can put in front of a young child. They are sturdy enough for little hands to work with, the right size for small projects, and the round shape opens up a world of spring possibilities from frogs to butterflies to sunflowers to rainbows.
This post has 20 easy paper plate crafts for toddlers and preschoolers that are perfectly timed for spring. Most use supplies you already have at home. All of them are genuinely achievable with children ages 2 through 5, and notes throughout will help you match each project to your child’s current skill level.
What You Need to Get Started
Before getting into the projects, here is a simple supply list that covers almost every craft in this post. Stock these basics and you are set for weeks of spring paper plate crafting.
- Paper plates, both standard sized and smaller dessert plates
- Washable paint in spring colors: yellow, green, pink, light blue, orange, and white
- Crayons and markers
- Child-safe scissors
- A glue stick and a bottle of school glue
- Construction paper in spring colors
- Googly eyes in a few sizes
- Pipe cleaners in green, yellow, and black
- Pom poms in assorted sizes and colors
- Cotton balls
- Tissue paper in spring colors
That is it. With those supplies and a stack of paper plates you have everything you need for every project on this list.
Spring Animal Paper Plate Crafts
Animals are consistently the most popular paper plate crafts for toddlers and preschoolers, and spring brings out the best of the animal kingdom. Frogs, chicks, bunnies, butterflies, and bees are all at home in a spring craft session and all translate beautifully to paper plates.
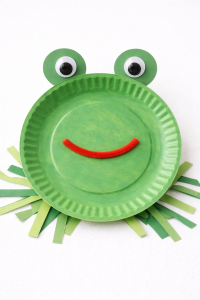
1. Paper Plate Frog
Frogs are one of the most searched spring animal crafts for preschoolers and this version is simple enough for children as young as 2 with a little help.
What you need: one paper plate, green paint, green construction paper, googly eyes, red pipe cleaner or red paper.
Paint the plate green and let it dry. Cut two circles from green construction paper for the eyes and glue them to the top edge of the plate so they stick up above the rim. Add googly eyes to the circles. Cut a wide smile from red paper or curl a red pipe cleaner into a smile shape and glue it on. Display on a windowsill or tape to the fridge and watch your child beam every time they see it.
Skills practiced: painting, gluing, color recognition. Best for ages 2 and up.
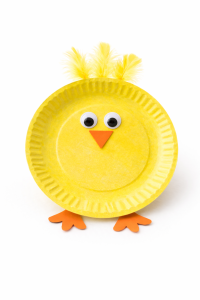
2. Paper Plate Chick
A sweet Easter and spring craft that toddlers absolutely love because the chick has such a cheerful personality.
What you need: one paper plate, yellow paint, orange construction paper, googly eyes, yellow feathers optional.
Paint the plate yellow and let it dry. Cut a small triangle beak and two small feet from orange construction paper and glue them on. Add googly eyes and glue a few yellow feathers to the top of the head if you have them. This chick works beautifully as an Easter craft and is one of those projects that even very young toddlers can participate in if you handle the painting setup.
Skills practiced: gluing small pieces, color recognition, spring and Easter themes. Best for ages 2 and up.
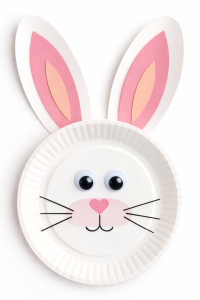
3. Paper Plate Bunny
One of the most popular Easter paper plate crafts year after year and one that looks far more impressive than the effort it takes. The three-layer ear detail and the heart nose give this bunny so much personality that children and parents are equally delighted with the result.
What you need: one paper plate, white construction paper, pink construction paper in two shades if possible, googly eyes, black marker, pink heart sticker or small pink paper heart.
Start with the ears since they are what make this bunny so distinctive. Cut two large tall oval shapes from white construction paper for the outer ears. Cut two slightly smaller ovals from bright pink construction paper for the middle layer. Then cut two small narrow ovals from a slightly darker or lighter pink for the inner ear detail. Layer all three and glue them together, then glue the finished ears to the back top of the plate so they stand tall above the rim. Cut a large soft oval from pink construction paper for the cheek area and glue it to the lower center of the plate. Add two large googly eyes above the cheek oval. For the nose, use a small pink heart sticker or cut a tiny heart from pink paper and glue it to the center of the cheek oval. Draw whiskers on both sides of the nose with black marker, three lines fanning out from each side, and add a small curved mouth below the nose. This bunny takes under 20 minutes and the result looks so charming that parents often want to keep it long past Easter.
Skills practiced: layering materials, gluing, Easter and spring themes. Best for ages 2 and up.
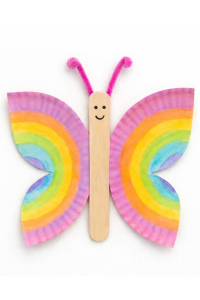
4. Paper Plate Butterfly
Butterflies are one of the signature images of spring and this paper plate butterfly is one of the most beautiful crafts on this entire list. Every child decorates the wings differently and that is exactly what makes each one special.
What you need: two paper plates, colored pencils or watercolor paints, a craft stick, two pipe cleaners, black marker, scissors, glue.
Start by cutting a paper plate in half so you have two equal halves. Each half will become one side of the butterfly wings. Next, shape the wings by cutting a small curved notch out of the outer curved edge of each plate half. This notch should sit a little below the center of the wing and creates the separation between the upper and lower wing sections while keeping the piece connected. This gives the butterfly its classic four wing shape. Once the wings are shaped, let your child decorate them using crayons, colored pencils, or watercolor paints. They can make rainbow stripes, swirls, polka dots, or any pattern they like. Encourage them to decorate both wings so they mirror each other. After the wings are decorated and dry, place the two plate halves on the table with the notched sides facing outward. Slide the inner edges of the plates slightly under the center area where the body will go so the wings overlap a little in the middle. Glue a craft stick vertically over the overlapping area to create the butterfly body and hold the wings together. Press firmly and allow the glue to dry completely. Next, bend two pipe cleaners into antenna shapes. Curl the ends or add small pom poms if you like, then glue or tape them to the back of the top of the craft stick so they stick up above the butterfly head. Finally, draw two small dots for eyes and a curved smile on the front of the craft stick with a black marker. Your butterfly is now ready to display on a wall, table, or bulletin board.
Skills practiced: coloring with control, symmetry concepts, multi-step assembly. Best for ages 3 and up.
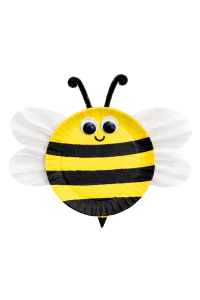
5. Paper Plate Bee
Bees and spring go together perfectly and this cheerful bee doubles as a handprint activity if you use your child’s painted handprints for the wings.
What you need: one paper plate, yellow and black paint, black construction paper, googly eyes, white tissue paper or handprint wings.
Paint the plate with yellow and black stripes across the body. For the wings, either cut oval shapes from white tissue paper or use your child’s handprints painted in white or yellow on white paper and cut them out. Glue the wings to the back of the plate, add googly eyes, and attach black pipe cleaner antennae to the top. If you use your child’s actual handprints for the wings this becomes a keepsake as well as a spring craft.
Skills practiced: painting stripes, pattern recognition, spring themes. Best for ages 2 and up.
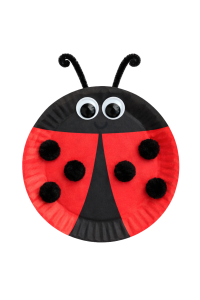
6. Paper Plate Ladybug
Simple, bright, and unmistakably spring. This is one of the best paper plate crafts for 2 year olds because it requires very little fine motor precision.
What you need: one paper plate, red and black paint, black construction paper, googly eyes.
Paint the top half of the plate red and the bottom half black to create the body and head. Once dry, cut a curved black line down the center of the red section to separate the wings. Add black circle spots using a finger dipped in black paint, cut small circles from black paper, or glue on black pom poms for a fun textured look. Glue googly eyes to the black head section and add black pipe cleaner antennae. Bold, simple, and very satisfying.
Skills practiced: color recognition, spot pattern creation, fine motor. Best for ages 2 and up.
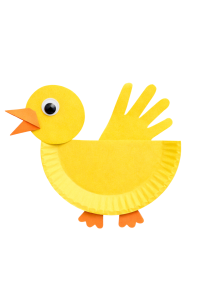
7. Paper Plate Duck
A spring and Easter favorite that uses simple construction paper shapes and a handprint wing to create a duck with real personality.
What you need: one paper plate, yellow construction paper, orange construction paper, googly eyes, black marker, scissors, glue.
Cut the paper plate in half and use one half as the duck body with the rounded edge facing downward and the flat straight edge along the top. Cut a large yellow circle from construction paper for the head and glue it to the left end of the body. Trace your child’s hand on yellow construction paper, cut it out, and glue the handprint to the right side of the body with the fingers fanning upward as the wing. Cut two small triangles from orange construction paper for the beak. Glue one pointing to the left for the upper beak and one pointing slightly downward below it for the lower beak to create an open mouth effect. Cut two small feet from orange construction paper and glue them to the underside of the body so they peek out below. Add a googly eye to the head. A simple and charming duck that comes together entirely from construction paper and looks far more impressive than the effort it takes.
Skills practiced: folding paper, gluing, spring theme vocabulary. Best for ages 2 and up.
Spring Flower and Nature Paper Plate Crafts
Spring flowers and nature themes are among the most searched kids craft ideas from March through May. These paper plate projects capture the colors and joy of the season in a format that is completely achievable at home.
8. Paper Plate Sunflower
One of the most popular spring and summer paper plate crafts for preschoolers and one of the most impressive results for how little effort it takes.
What you need: one paper plate, yellow and brown paint, yellow construction paper, real sunflower seeds optional.
Paint the center of the plate dark brown. Cut petal shapes from yellow construction paper and glue them around the back edge of the plate so they fan out around the brown center. If you want to add a wonderful sensory element, have your child glue real sunflower seeds to the brown center while the paint is still a little tacky. The result looks beautiful on a wall and children are incredibly proud of this one.
Skills practiced: fine motor cutting and gluing, nature vocabulary, spring themes. Best for ages 3 and up.
9. Paper Plate Rainbow
Rainbow crafts are among the most searched spring kids craft ideas year after year. Rainbows feel like spring, children are obsessed with them, and this version is one of the simplest and most beautiful ways to make one.
What you need: one paper plate cut in half, paint in red, orange, yellow, green, blue, and purple, white cotton balls.
Cut the plate in half. Have your child paint arching stripes across the cut edge in rainbow order from red at the outside to purple at the inside. Once dry, glue cotton ball clouds to each bottom end of the rainbow. This craft looks beautiful hanging in a window or on a wall and is one of the most saved paper plate projects on Pinterest every spring.
Skills practiced: color order and sequence, painting within arched sections, spring themes. Best for ages 2 and up.
10. Paper Plate Flower
A simple spring flower that toddlers can make almost entirely independently once the supplies are set up.
What you need: one paper plate, paint in any flower color, green construction paper, a popsicle stick.
Paint the plate in any bright spring color for the flower head. Cut petal shapes from the outer edge of a second plate if you have one, or cut petals from construction paper and glue them around the back of the painted plate. Glue a green popsicle stick stem to the back. Cut two green leaves from construction paper and attach them to the stem. Simple, colorful, and perfect for a spring garden display.
Skills practiced: painting, assembling multi-piece project, color choice. Best for ages 2 and up.
11. Paper Plate Garden Scene
This one is more of an open-ended spring activity than a single craft and it works beautifully as a longer rainy day project.
What you need: one large paper plate, green and blue paint, construction paper in spring colors, tissue paper, pom poms.
Paint the bottom third of the plate green for grass and the top section blue for sky. Once dry, have your child create a whole spring garden scene using construction paper flowers, tissue paper butterflies, cotton ball clouds, and pom pom bees. There is no right or wrong way to fill the scene. This project develops creative decision making alongside fine motor skills and the result is a genuinely unique piece of spring art.
Skills practiced: creative composition, scene building, color mixing. Best for ages 3 and up.
Easter Paper Plate Crafts
Easter falls right in the heart of spring and paper plates lend themselves beautifully to Easter themed projects. These are some of the most saved Easter craft ideas for toddlers and preschoolers.
12. Paper Plate Easter Egg
An Easter staple that works for children of every age and can be decorated in an infinite number of ways.
What you need: one paper plate, paint in spring colors, markers, stickers, tissue paper.
Cut the paper plate into an oval egg shape. Have your child decorate it any way they like using paint, markers, dot stickers, tissue paper scraps, or glitter glue. No two eggs ever look the same and that is exactly the point. Display a collection of decorated eggs together on a wall or string them on yarn for a spring garland. One of the most versatile Easter crafts on this list.
Skills practiced: open-ended decorating, creative expression, fine motor. Best for all ages.
13. Paper Plate Easter Basket
A craft that doubles as a functional Easter basket your child can actually use for an egg hunt.
What you need: one paper plate, paint, a strip of cardstock for the handle, stapler, tissue paper.
Fold the paper plate in half and paint or decorate the outside. Staple or glue the sides together leaving the top open. Staple a strip of cardstock across the top as a handle. Line the inside with strips of green tissue paper for grass. This Easter basket is sturdy enough for a small egg hunt and children love using something they made themselves.
Skills practiced: folding, functional craft making, Easter themes. Best for ages 3 and up with adult help on stapling.
14. Paper Plate Chick Hatching from Egg
A slightly more involved Easter craft that produces a wonderfully playful result children love to show off.
What you need: two paper plates, yellow and white paint, orange paper, googly eyes, brass fastener.
Paint one plate white for the egg and cut a jagged crack line across the middle. Paint a smaller plate or a circle cut from a plate yellow for the chick face. Attach the top egg half over the chick face using a brass fastener so it can swing open and closed. Add a googly eye and orange beak to the chick. When closed it looks like an egg. When the top swings open, the chick appears. Children will open and close this for days.
Skills practiced: mechanical understanding, cause and effect, multi-step assembly. Best for ages 4 and up.
Creative and Process-Based Spring Paper Plate Crafts
Not every spring craft needs to be a recognizable object. Some of the best paper plate activities for toddlers are open-ended and process-focused, meaning the joy is in the making rather than in achieving a specific result.
15. Paper Plate Spring Suncatcher
One of the most beautiful spring paper plate crafts on this list and the result genuinely stops you in your tracks when the light hits it.
What you need: one paper plate, scissors, tissue paper in spring colors including yellow, pink, green, and light blue, diluted school glue.
Cut out the center of the paper plate leaving just the rim. Have your child tear small pieces of tissue paper and layer them across the opening using diluted glue brushed on with a foam brush. Use spring colors and let them overlap freely since overlapping tissue creates beautiful new colors where the layers meet. Once dry the tissue paper creates a stained glass effect when hung in a sunny spring window. This is one of those crafts that looks professional despite requiring almost no skill.
Skills practiced: tearing, layering, color mixing through transparency. Best for ages 2 and up.
16. Paper Plate Spin Art
A process-based craft that produces dramatic results and that children ask to repeat over and over.
What you need: paper plates, washable paint in spring colors, a lazy Susan or spinning tray.
Place a paper plate on the spinning surface. Have your child squeeze drops of spring colored paint onto the center while slowly spinning the plate. The paint spreads into beautiful circular patterns that look like professional spin art. Use yellow, pink, green, and lavender for a spring color palette. Each plate is completely unique and the process is endlessly satisfying even for very young toddlers.
Skills practiced: cause and effect, color mixing, creative expression. Best for ages 2 and up.
17. Paper Plate Watercolor Wash
A calming spring art activity that produces soft, beautiful results perfect for displaying.
What you need: paper plates, watercolor paints, a wide brush, water.
Give your child a paper plate and watercolor paints in spring colors. Let them paint freely across the whole surface using lots of water for a soft wash effect. The circular shape of the plate naturally creates a beautiful composition and the watercolor blooms in ways that feel magical to a young child. Display the finished plates as circular spring art panels on a wall.
Skills practiced: brush control, color exploration, process art. Best for ages 2 and up.
Spring Learning Crafts Using Paper Plates
Some of the best spring paper plate crafts for preschoolers double as genuine learning activities. These projects build specific skills while also producing something beautiful.
18. Paper Plate Spring Color Wheel
A simple and beautiful introduction to color mixing that connects perfectly to what your child sees in spring flowers outside.
What you need: one paper plate, paint in red, yellow, and blue, markers to divide the plate.
Draw lines to divide the plate into six sections. Have your child paint alternating sections in red, yellow, and blue. Then talk about what color you get when you mix the neighbors. Red and yellow make orange. Yellow and blue make green. Blue and red make purple. Fill in the remaining three sections with the mixed colors. A hands-on color theory lesson that produces a beautiful spring art piece.
Skills practiced: color theory basics, mixing, following directions. Best for ages 3 and up.
19. Paper Plate Life Cycle of a Butterfly
A spring science craft that works beautifully alongside books about caterpillars and butterflies and is one of the most popular preschool spring learning activities.
What you need: one paper plate divided into four sections, paint, construction paper, markers.
Divide the plate into four sections and label them egg, caterpillar, chrysalis, and butterfly. Have your child draw or create each stage in its section using paint and construction paper. Use a small oval for the egg, a green painted caterpillar made from fingerprint circles, a brown oval chrysalis, and a painted or cut butterfly. A wonderful way to connect a craft to a science concept that preschoolers are genuinely curious about in spring.
Skills practiced: sequencing, science vocabulary, fine motor. Best for ages 3 and up.
20. Paper Plate Weather Wheel
Spring weather is famously unpredictable and this simple weather wheel turns that into a daily learning activity.
What you need: one paper plate, paint or markers, a brass fastener, cardstock arrow.
Divide the plate into sections and decorate each with a different type of weather: sunny, cloudy, rainy, windy, and rainbow. Cut an arrow from cardstock and attach it to the center of the plate with a brass fastener so it can spin. Each morning have your child look out the window and spin the arrow to the weather they see. A craft that stays relevant all spring and builds early science observation skills every single day.
Skills practiced: weather vocabulary, observation, daily routine. Best for ages 3 and up.
Tips for Spring Paper Plate Crafting With Toddlers and Preschoolers
- Set up your workspace before bringing your child to the table so everything is ready the moment they sit down
- Use washable paint for everything and keep a damp cloth nearby for quick color changes
- Spring colors are yellow, green, pink, light blue, and orange. Pulling these out and putting away the winter palette immediately makes the session feel seasonal
- Let your child choose which spring animal or project they want to make to build ownership and excitement
- Display finished spring crafts on a dedicated wall or window space so your home fills up with your child’s seasonal artwork
- Keep sessions to 15 to 20 minutes and always end while your child is still engaged and asking for more
- Take a photo of every finished craft with your child holding it before it goes on the wall. These photos become some of the most treasured records of early childhood.
Frequently Asked Questions
What age are these spring paper plate crafts designed for?
All 20 crafts on this list are designed for children between the ages of 2 and 5. The simpler animal crafts like the frog, chick, and bunny work well from age 2 with a little adult help on cutting. The more complex projects like the hatching chick egg and the butterfly life cycle wheel are better suited to ages 4 and up. Notes are included with each craft to help you match the right project to your child.
How do I make paper plate crafts less messy in spring when we want to be outside?
Take the crafts outside. A plastic tablecloth or a few sheets of newspaper on an outdoor table makes cleanup as simple as rolling everything up and throwing it away. Spring crafting outside means the mess stays outside and your child gets fresh air at the same time. Keep a bucket of soapy water nearby for hand washing and you are set.
Where do I find paper plates for crafting?
Standard white paper plates from any grocery store or dollar store work perfectly for all of these crafts. The plain white uncoated variety takes paint better than the coated or patterned ones. Buying a bulk pack means you always have them on hand for a spontaneous craft session, which is often the best kind.
How do I display spring paper plate crafts at home?
Most paper plate crafts can be hung directly on the wall with a small piece of removable tape or a thumbtack. For a cohesive spring display, hang a collection of spring crafts together on one wall or in a window. Rotating your child’s seasonal artwork every few months teaches them that their creations are worth celebrating and gives your home a warm, lived-in quality that no store-bought decoration can replicate.